Body

Searching Assets

The AMS features robust searching capabilities with nearly all record fields being allowable search parameters. This portion of the guide will cover search features and tools. Equipment Custodians must have a solid understanding of the search functions in order to keep asset records updated.

This guide was created to assist departments with understanding the assignable system roles, navigation, and features. If you have any questions that are not answered within this guide please send your inquiry to amsfeedback@ucr.edu.


Quick Navigation


Search Functionality

This section covers how to perform a basic or advanced asset search query, how to generate a listing of all a current active Inventorial Equipment records in an accountability structure (for inventory purposes), and how to export the search results to a Microsoft Excel spreadsheet.

  1. Open the Search Assets Menu Item

    From the AMS Homepage click on the Search Assets Icon (shown below)

    search_assets_tool.png
  2. Complete the General Search Criteria

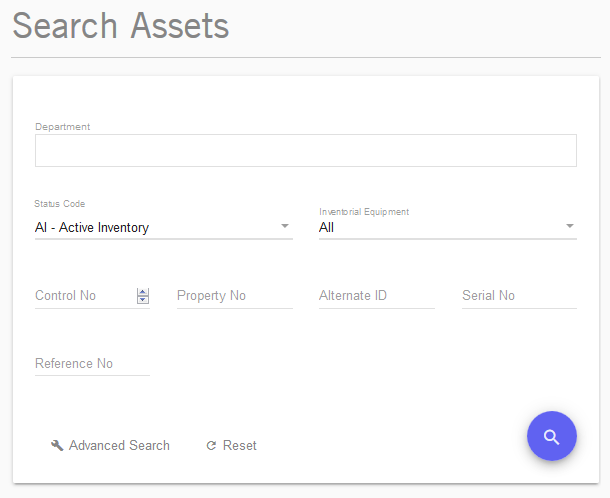
    The Search Assets Screen (shown below) is used to both pull up specific asset records by their associated identification information or for generating inventory listings by a variety of factors (such as accountability structure, location, cost, etc.). For the purpose of the university's annual inventory it is used by Equipment Custodians to generate the listing of active Inventorial Equipment assets that are required to be verified, details specifically for generating this listing are covered in the below sections.

    search_assets_screen.png

    The most common search criteria (Department(s), Status Code, Inventorial Equipment, Control Number, Property Number, Alternate ID, Serial Number, and Reference Number) are located on the primary Search Assets Screen. All other search fields are located within the Advanced Search menu. By default the Status Code is set to Active Inventory (so previously disposed records are not listed). Please note that an Equipment Custodians can only search for assets within their assigned accountability structure.

  3. Click on the Search Icon (Magnify Glass)

    Once the desired search criteria has been entered the user will need to click the Search Icon (shown below) to populate the Search Results section which will appear immediately below the Search Assets section. Please note that the AMS does have some search results limitations to ensure the system performance remains optimal during heavier loads. Search results in the AMS views are limited to the first 1000 asset matches. If more than 1000 assets are identified the search criteria should either be made more specified or the data will need to be exported to an Excel File. The Excel Files generated by the AMS are not limited to a specific number of assets.

    search_icon.png

    If a search contains more results than the selected "Items Per Page Field" is set to display, the search results will be tabulated into multiple pages. The pages can be navigated between using the previous and next links within the page navigation pane (image below) that will appear at the bottom of the Search Results window. The "Items Per Page Field" functionality is further explained in the below Other Search Tools Section.

    page_navigation.png

    To clear all search criteria and results simply click on the “Reset” link on the bottom-left section of the Search Assets Screen. Also please note that searches in the AMS are persistent until either a new search is performed or the user signs out of the system, this means a user can navigate between the individual asset records and the search results without concerns over losing the search results.

  1. Complete the General Search Criteria

    As mentioned in the above Basic Asset Search Section, enter in the desired search parameters for the search criteria that are on the main Search Asset Screen. These fields should be completed prior to entering the Advance Search Screen as the search will be performed from the Advance Search Screen directly.

  2. Click on Advance Search

    The Advance Search function (shown below) is located in the bottom-left of the Search Assets window.

    advanced_search_link.png
  3. Complete the Advance Search Criteria

    An advance search allows nearly all record fields to be queried. In additional several ranges can be searched including the assets Accounting Date (date of the record creation), Cost, Useful Life, and date of Disposition. For additional information on the specific details of each fields please refer to the Terms & Data Fields Section of this guide.

  4. Click on the Search Icon (Magnify Glass)

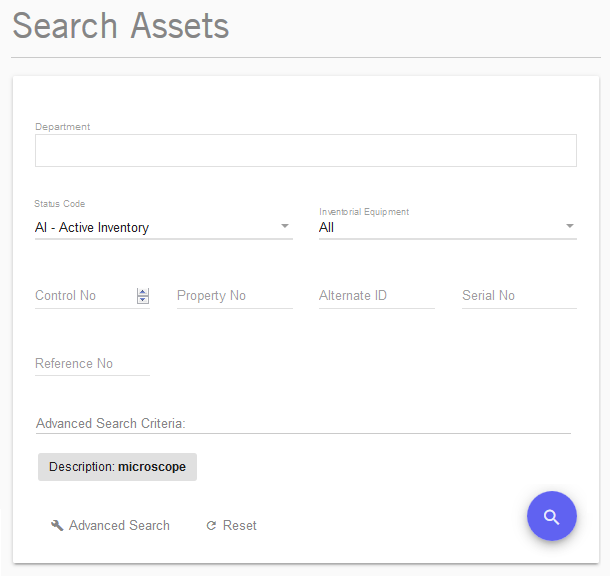
    Once the desired search criteria has been entered into the advance search the user will need to click the Search Icon at the bottom of the Advanced Search Screen to perform the query. Additionally, all the advance search criteria selected will populate onto the primary Search Assets Screen. Below is an example of the Search Asset Screen when an advances search is used to locate all assets with the word "microscope" within the description field.

    advance_search_screen.png

    Generally, all the search criteria entered must match the exact data in the asset database for an asset record to appear within the search results with the exception that the Description, Manufacturer, Model, and Serial Numbers will still be located by a partial string (meaning if you only know a portion of the information for those fields it will still show up in the search results).

Generating a Listing of All Active Inventorial Equipment

  1. Open the Search Assets Menu Item

    From the AMS Homepage click on the Search Assets Icon (shown below)

    Search Assets Tool
  2. Complete the Required Query Criteria

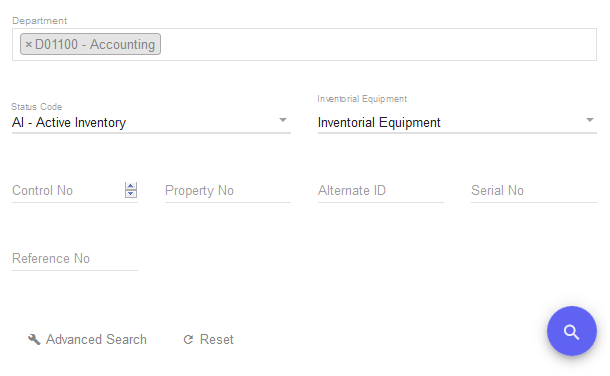
    To generate the listing the fields must be completed as follows:

    • Select the desired Department (or Accountability Structure)
    • Set the Status Code Field to "AI-Active Inventory". This will ensure that all previously disposed assets are not within the generated search results.
    • Set the Inventorial Equipment Field to "Inventorial Equipment". This removes all records that are not required to be inventoried (if any exist).
    • Ensure all other fields are empty (set to null).

    Below is an example of the search criteria required to generate the active Inventorial Equipment that would be required to be verified for the Accounting department's annual inventory.

    Search Active Inventory
  3. Click on the Search Icon (Magnify Glass)

    If all the fields match the above image (with the exception of the Department selection) click on the Search Icon and the AMS should generate the required listing. Please note that not all departments have Inventorial Equipment, if there are no search results generated this is likely the cause. The total number of Active Inventorial Equipment assets can be confirmed by entering the Inventory Verification Menu Item(explained in the Inventory Verification Section of this Guide) and viewing the data in the second column.

Exporting Searches to Excel

  1. Run Search Query

    As explained in any of the above in this Search Assets Section.

  2. Click on Download As Excel File

    After the search results are generated clicking the Download as Excel File link (shown below) will instruct the AMS to collect the asset data and generate an excel spreadsheet. This function is located in the upper right corner of the Search Results section.

    Excel Link

    The excel file will contain many additional columns of data fields from the asset records making it a more idea environment for in-depth analysis, it also does not have any limitations to the number of records that can be viewed. For more information on these fields please refer to the Terms & Data Fields Section of this guide.

  3. Open Excel Spreadsheet (Allow Popup Windows)

    Your web browser may ask if you want to allow popup windows from the AMS, if this is the case please give the AMS application permission to ensure that the browser is not preventing data downloads.

Other Search Tools

This section covers how to use the search views, search filter, item per page limits, and column sorting to manipulate the search results data after a search query has been performed while within the AMS itself.

Search Results Views

The AMS has two unique views for displaying search results that can be switched between while maintaining the applied filter, sorting order, and current page (if the Datasheet View items per page is set to 25). For the sake of this guide these two views will be referred to as the Datasheet View and the Tile View.

Datasheet View
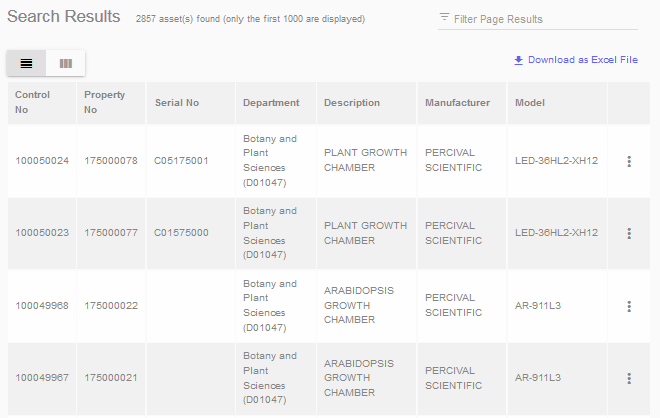
The Datasheet View is the default view which display the search results in a basic table. This table contains general information about each assets information, identification, and assignment.

DataSheet View

Tile View
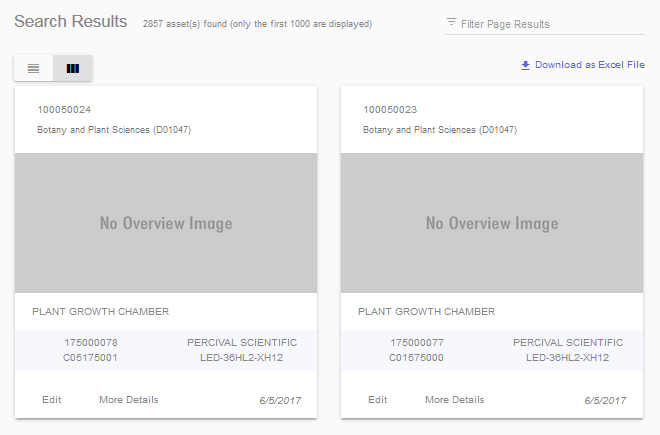
The Tile View essentially displays the same information as the Datasheet View with an alternative layout, but with the exception that this view also displays the Overview Image associated with each asset record. This view is optimal for performing the inventory once photographs of the assets have been uploaded to the AMS.

Tile View

Switching Between Views
To toggle between the two views there is a set of buttons (shown below) located on the upper left corner of the Search Results section. The left button portion corresponds to the Datasheet View, while the right corresponds to the Tile View. When using the AMS from a smaller screens, such as mobile phones, it is recommended that the Tile View be utilized as the Datasheet View has not been optimized for such devices.

View Toggle

Sorting Search Results

Search results by default are sorted by their associated Control Number from the highest to lowest value (which would also be from the newest to the oldest record). The sorting order of the results can be modified by clicking on the Table Header Fields on the Datasheet View. All of the Table Header Fields (Control Number, Property Number, Serial Number, Department, Description, Manufacture, and Model) can be used to sort the search results. Additionally clicking the same Table Header Field a second time will reverse the sort order of the selected column.

The Tile View does not directly have any sorting functions within it, however, any sorting performed in the Datasheet View will be applied to the Tile View.

Filtering Page Results

In addition to the general search functionality, there is also a filter function that can be used to quickly locate a specific asset, or type of asset, within the current search results page without having to run an additional query. This filter is located in the upper right corner of the Search Results section after a query is performed. The filter function is similar to the "word find" features built into other applications such as Internet Explorer and Microsoft Office. It will search all the currently displayed data fields (Control Number, Property Number, Serial Number, Department, Description, Manufacture, and Model) on the current page of search results and remove all records not containing the filtered word or phrase within any of the display data fields.

Filter

To ensure the filter functionality does not negatively impact the performance of the AMS, the filter can only be applied to the search results on the current page (not all the pages of search results). When navigating between the search result pages, the filter will be automatically applied. In the Datasheet View, the number of records displayed on a page can be modified (as mentioned in the next section) to filter the entirety of the search results, however, this is not available with the Tile View.

Items Per Page (Datasheet View Only)

In the Datasheet View the number of records listed per page can be set to 25, 50, 100, or All. This is not available in the Tile View which is always locked to display 25 records to ensure there is not a loss of system performance from loading all the asset Overview Images. This is important to note as an Equipment Custodian can switch between the two views while maintaining the current pages record data only when 25 records are being viewed at a time in the Datasheet View. Switching between views while displaying more than 25 records per page will cause the page navigation to lose sync. This is not necessarily problematic, but could potentially result in confusion if the user is unaware and actively switching views.

The main advantage of the Items Per Page feature is to allow the Datasheet View to display all records on a singular page which allows the entirety of the search results to be filtered at once.